GARDENING -

The constant challenges of an everyday vegetable gardener and dealing with all the aspects of planting as an amateur.

It is an awareness that helps to achieve Garden perfection.


Sunday, October 23, 2011

Friday, October 14, 2011

Planting veggies - use all extra space - be creative

We try to utilize ALL SPACE in the garden areas. Here, just off the street and side walk area is the common placement of the utility boxes with plenty of UNUSED space. We utilized this this for winter bok choy, lettuce and radicchio. Creative use of all areas will allow a more abundant crop. This is the same area that we removed the beautiful zinnia's that were in bloom all summer - see previous blogs for zinnia pictures.

Growth box - Peppers update

Notice the beautiful green pepper on this earth box and that one plant is filled with another 20 peppers in different phases of growth. We have been eating these for at least 3 plus weeks now and this is out winter crop. If you want a closer look at the beginning growth stages of this pepper growth (earth) box, look at my other blogs from a few weeks ago. Tremendous results.

Growth Boxes - update - Broccoli

The first head of broccoli appearing this past week (notice center of picture) from this growth box.
They continue to thrive in every container. Can't say enough about this planting method that is cheap
to make and even cheaper to water.

Red Ants out of control

These little creatures never quit multiplying and they can bite in a heart beat. I have repeatedly used a granular pesticide and it seems like they rapidly move
to a new colony. When they bite, look out. Their bite not only hurts at first, but
then itches like crazy for a week or so after forming a large pimple-like white
head. Never saw any thing like it. I've learned to wear higher socks in the yard
and then spray over my work shoes and socks with an ant repellent. This gives
me a fighting chance.
The best solution I have found to stop the itching and dry them to a scab quickly
is benedryl liquid with an itching solution. Use it especially at night or you will wake                                    up itching to no end in the middle of the night. Be careful, they climb your legs as fast
as anything I have ever seen.

Tuesday, October 4, 2011

Earth boxes (aka) Growth boxes -- update


Home made growth boxes thriving and eating from most already of the winter crop!!
Let me know if you have any questions or comments.
Thanks.

Friday, September 23, 2011

Earth Box peppers

Just picked these fresh today from our fall crop that was planted in an earth box, made by myself. I can't speak highly enough about how to plant veggies with limited water requirements and these can be used for many years without changing soil etc...
Shortly I will share the rest of the crop including lettuce (we had some already today for a nice salad), cabbage, cauliflower, chard and many other fall crops that continue to thrive in these containers.

Garden ants

Woke up in the middle of the night with several huge bites on my legs that itched like H______. I was in the garden again yesterday, with high socks, and yet those darn ants started crawling up my leg and bit me to no end. I thought I got into the house in time to wash and apply some calamine lotion to avoid problems later but that apparently doesn't matter. The itch is incredible. I'm to the point of protecting my entire body anymore when I'm in the yard working. Yes, you will be hot but worth it later. Watch out for those ants, they are easy to overlook.

Thursday, September 22, 2011

Earth boxes going wild


I had reported previously regarding the use of Earth boxes (I make my own now) and believe me, that are just growing like crazy for the fall crop. The idea of watering so inexpensively and not worrying about diseased soil is a blessing in itself. This is the way to plant veggies!! If you would like to know how inexpensive it really is to build one of these, and how easy it is - just drop me a note. I will walk you through it. Good luck planting!!

Wednesday, August 31, 2011

Eggplant just contiues to be the garden hero

Eggplant is clearly the star of our summer gardening. It just doesn't seem to quit producing. I just picked these again this morning and have more than this to pick in another day or two and they are delicious. While other vegetables struggled with some of the soil, heat and lack of water - there was simply no adverse effect to our Eggplant. I would recommend it for any garden!

Earth Box growth - update


Please review my earlier Blog regarding the use and start up of earth boxes. Well, a few weeks later and look at the growth of these pepper plants. They are producing and just continue to thrive. It made a believer out of me!! Thanks to a friend in Florida who recommended to us.

Okra Galore

Okra plants just keep producing. Look at the plants from May and they continue to harvest and harvest.
I just picked these fresh this morning and we have a ton more coming. If you are an Okra fan, plant your own, so much cheaper than buying at a store and they are simply delicious when fresh off the vine. There are also endless possibilities for different recipes with Okra.

Notice the crop from today and these grew like wildfire again in two days when they wee not even quite ready. So, when is Okra ready? It is best at 2-3 inches in length. Anymore than that and they can be difficult to work with when baking. Keeping them at 2-3 inch length at harvest keeps them from getting woody. They are young and tender at this length. Notice the Okra on the left, just too long and went unnoticed versus the one to its right. You will notice when you put a knife through them.
Just enjoying our own Okra in the South!!

Sunday, August 28, 2011

What are these critters??

Found these on our parsley just having a picnic. Does any one know what these critters are? Very strange looking. Thanks.

Found this to be Great for dying roses


I found this Tree and Shrub Protect & Feed to be great for the rose shown above that was on its way out. Apparently this liquid goes into the root system and kills bugs once they start to eat on the rose plant. So far, so good, thought I would share it with you.

Monday, August 22, 2011

Baby Frog - where did it come from up here??


Look at this little creature, a baby (really tiny) frog in the corner of a leaf from an Okra plant towards the top of the tree. A great camera shot but I don't understand how it got so far up the plant. Guessing it was born right there. Notice the little eyes opened. It was sleeping when I took the first shot. Can't find mama anywhere in sight. But oh what a find!

Our Friend - the Preying Mantis

Here is a great shot of our garden friend. After so many garden enemies, it's nice to see a friendly face on occasion. Look CLOSELY, hard to see it.

Saturday, August 20, 2011

Bug bites again

Saturday, August 20, 2011


Not so Persistent Gardener - Bugs bite again!!

Another bug bite in the garden and it was once again - poor judgement on my part. WEAR SOCKS!!!!!!!!!
LOOK  AT THESE BLISTERS JUST SINCE YESTERDAY - IT IS DISGUSTING AND ITCHY AS CAN BE. I may be visiting the doctor again by Monday.
See my blog below "titled" Safety First  - that took 6-8 weeks to heal that thumb for not waring GLOVES.

ANYWAY, BE SMART, BE SAFE - IF YOU ARE GOING TO GARDEN - PROTECT YOURSELF.
I've used a dermatology solution and Peroxide so far, took some Benedryl and still no results. I see another Doctor visit coming soon!
UPDATE> Found out that these are ant bites - darn. I was in the garden trying to get rid of a large ant hill so this does explain it. Ant bites get itchy then swell like a pimple with a white head. I used Calamine lotion with bendedryl solution and that started to dry it up and stopped the itching.

Friday, August 19, 2011

The not so consistent "Persistent Gardner"

What a season of learning. It is true, the coastal areas of the south are quite different from other regions in the country. Hot, dry, bugs, diseases - you name it. I visited my local nursery today and even the owner admitted to me that after several years, he is still learning.
Takes time along the Carolina coast. Just keep experimenting, eventually it comes around albeit may be costly the first few years. Eventually, I have learned that you know what to plant and harvest and what to buy at your local markets.
Going forward now, into fall crops. Hoping these will be a better experience. Will keep you posted.
Best of luck with your winter crop!

Friday, August 12, 2011

Planting in the South - what I've learned

Wow, what a summer of planting and harvesting crops - especially veggies.
There is a MAJOR DIFFERENCE BETWEEN THE NORTH AND THE SOUTH.

July and August are brutal to crops in the South. Of all the veggies we have planted, the
Egg Plant, Sweet Peppers and some Squash were the best. Carrots were ok as were the
radishes but TOMATOES were HORRIBLE.  THOSE WERE A TOTAL WASTE OF MONEY.

The heat and wilt disease is just too much to deal with. I am a firm believer in the Earth box but I think it is too late for those as well. Go to earthbox.com to learn more and you can actually make your own earth
box for either the winter or next spring growing season.

It was fun, however, but when you quantify the money spent on Tomatoes and other certain veggies, plus the usage of watering - it is simply cheaper to buy at the local grocer or markets.

Best of luck in the coming growing seasons but believe me, I have studied and tried everything and the SOUTH is simply a different animal for certain veggies!!!


Wednesday, August 10, 2011

Saving zinnia plant seeds for next year

After having gorgeous flowers all summer from our zinnia seeds (see pictures) we decided to cut a few of these beautiful creatures and got an abundance of seeds for next year. What a cheap way to maintain a beautiful bed of flowers year after year without costing you a penny. We will show you the results when we replant these seeds again next growing season and we do expect a tremendous array of zinnias.

Sunday, July 31, 2011

Planting pots

I attended a class today from an Instructor who is a Master Gardener. It is interesting what you can learn. He said that if you plant veggies in black containers, the heat can get as high as 120 degrees. His suggested was to spray paint the black pots a white color before using them. He also spoke about using a fertilizer that should always start with a 10 - for example - 10/10/10 because the Nitrogen is the first 10 and it will release the quickest and therefor a fertilizer starting with a number 10 first, is the best.
Don't know if this is useful or not but here are a few other tips:

To make your own soil for starterseeds, include the following:
1) 2 parts compost
2) 2-4 parts Sphagnum Peat Moss
3) 1 part sand
4) s part Perlite
5) 1 part Vermiculite

Fertilizing annuals such as tomatoes, peppers,corn etc... (every two weeks) only use a water soluble fertilizer and for perennials - (every 4-6 weeks) only use a slow release in conjunction with a water soluble.

You might want to follow this guys link at www.thecitrusguy.blogspot.com/

Saturday, July 30, 2011

seeds

 After deciding to go with seeds and grow veggies from starter boxes, I had trouble with developing a good hot house effect with the saran wrap that the directions suggested. So I discovered a great alternative that is better and easier to maintain and created quite a mositure buildup with the container - I bought "clear" kitchen trash bags and they are so easy to use and work great. Try them next time!
UPDATE
IN FOUR DAYS, WE HAVE GROWTH ALREADY!!

Friday, July 29, 2011

Tomatoes

After a disastrous time with tomatoes because of the heat (Lost most of them), I found a way to make use of the green tomatoes anyway. There are several recipes to be found on Internet sites that provide great recipes for several uses of green tomatoes. Recently tried a green tomato sauce on pasta that was excellent. So next time you think about getting rid of those green tomatoes, check out some great recipes first.

Garden insect bites that itch

I work a lot in the garden area. One day I was explaining to another Gardener how many times I get a bite that itches like crazy. This was a Vietnamese woman who said, "ah, you don't know"? I thought, know what - she said "how to stop an insect bite itch". Obviously I did not but I had two that were driving me crazy. Her simple solution was - take some salt, wet it and rub it onto the entire bite area.

Wow did it work, I couldn't believe it!! Try it next time you get an itchy bite that drives you crazy.And many thanks to that gardener for such a simple solution.

Monday, July 25, 2011

Risk Reward - Tomatoes

We have purchased, planted, replanted and LOST every tomato in our garden in South Carolina. We have finally given up.
The cost to purchase tomatoes at a store or market stand is much cheaper!

Most folks in the neighborhood have done the same. They say it is just the pure heat in South Carolina.
While I am not totally convinced that is all it is, I am beginning to be a believer.

After attempting several different growing methods: in raised beds; in round plastic containers; in separate soil areas - nothing works. They will grow and mature to a point and then suddenly, they just start to deteriorate and never look back. There is no saving a tomato plant once it starts to deteriorate.

Reluctantly, I have attempted one final option - the earth boxes that I refer to in my other blog comments. So far, so good, BUT , it is too early to call. Every one I have spoken with in the South swears by these earth boxes - www.earthbox.com - but as I said, the jury is still out for me. I will keep you posted on my results. Until then, here I come grocery store.

I could have bought tomatoes for the entire summer already on what I have spent to attempt to produce my own in SC.

Growing Avocados from Pits

Interesting, good friend taught me this method: take the pit from the avocado, placing three toothpicks in  the sides of the avocado that will support itself over a container with water. Place it over container so the base of the pit sits in the water. Store this in a cool, dark spot and keep the water level up so that it covers the pit base. Eventually the top will crack, the germination begins and (when the seed cracks and you will notice roots on the bottom) and then, when the avocado starts to grow a few inches - plant it. See link below.

Sunday, July 24, 2011

Waiting to Harvest - too late


I had this beautiful red/golden tomato ready to harvest and thought I would let it go just one more sunny day. Sure enough, one of those stinking little critters, probablya squirrel had it on the ground gnawing away at it the next morning. Learned my lesson here - when they look good, pull them!!

Garden boxes - I'm trying it!

This is the basic plastic storage box I started with after reading directions on the link below which I have attached. This process is totally experimental but a few folks I have spoken with, love and swear by this method. http://www.earthbox.com/ The final pictures indicate the growth of the peppers after one week and the two tomoato plants after five days.

To the right is the support system which consists of various one gallon used plant pots available free at almost any nursery or big box garden retailers who recycle these containers or just getting rid of them. These containers will support the base (the lid of the storage box) which is cut out to fit inside and hold the potting mix.
I have now placed the storage top (after cutting it to fit) into the box itself (atop the one gallon pots). I then drilled several holes atop the storage lid to allow for some drainage AND cut out two holes at both opposite ends of the storage box over the two pots. This will allow for potting soil to be placed into these two pots only. I then used duck tape (yes, duck tape) to seal the edges of the lid onto the the inner sides of the container box. This prevents any potting mix from falling into the base of the container.

The picture below is the PVC pipe (1 3/4 or 2 inch) is then installed for watering but FIRST drill about 6-8 small holes at the bottom of the PVC pipe about 4-6 inches up the pipe. This will allow for the water to fill the container at the bottom from the water coming from the top of the PVC pipe. Next, cut a hole in the storage lid just large enough to allow the PVC to be lowered to the bottom of the container and about a foot "above" the top rim of the container. Then secure this with duck tape to the sides of the container if there is any opening from the cut you made. You are now ready to place potting mix to in the container.
Fill the container and the two end pots (on both ends where you made a cut out above the two pots). Fill with potting mix to within 2-3 inches from the top of the rim (as shown). Now. lightly soak the potting mix with water to allow it to settle a bit. This will be THE ONLY TIME that you water the soil. Now fill the container to the top rim with potting soil as shown below.
You are now ready to add some type of slow release vegetable plant food. I originally looked for Dolomite but settled on a similar Vigoro ganular mix. Spread the soil from side to side with about a 2 inch depth to allow for 2 cups of plant food. See below, then cover the plant mix with the soil from the 2 inch spread that you did. Now drill three holes on both 'ends' of the container just about an inch below the "container support lid" that the soil is resting upon. This will allow drainage and keep the water at that level.

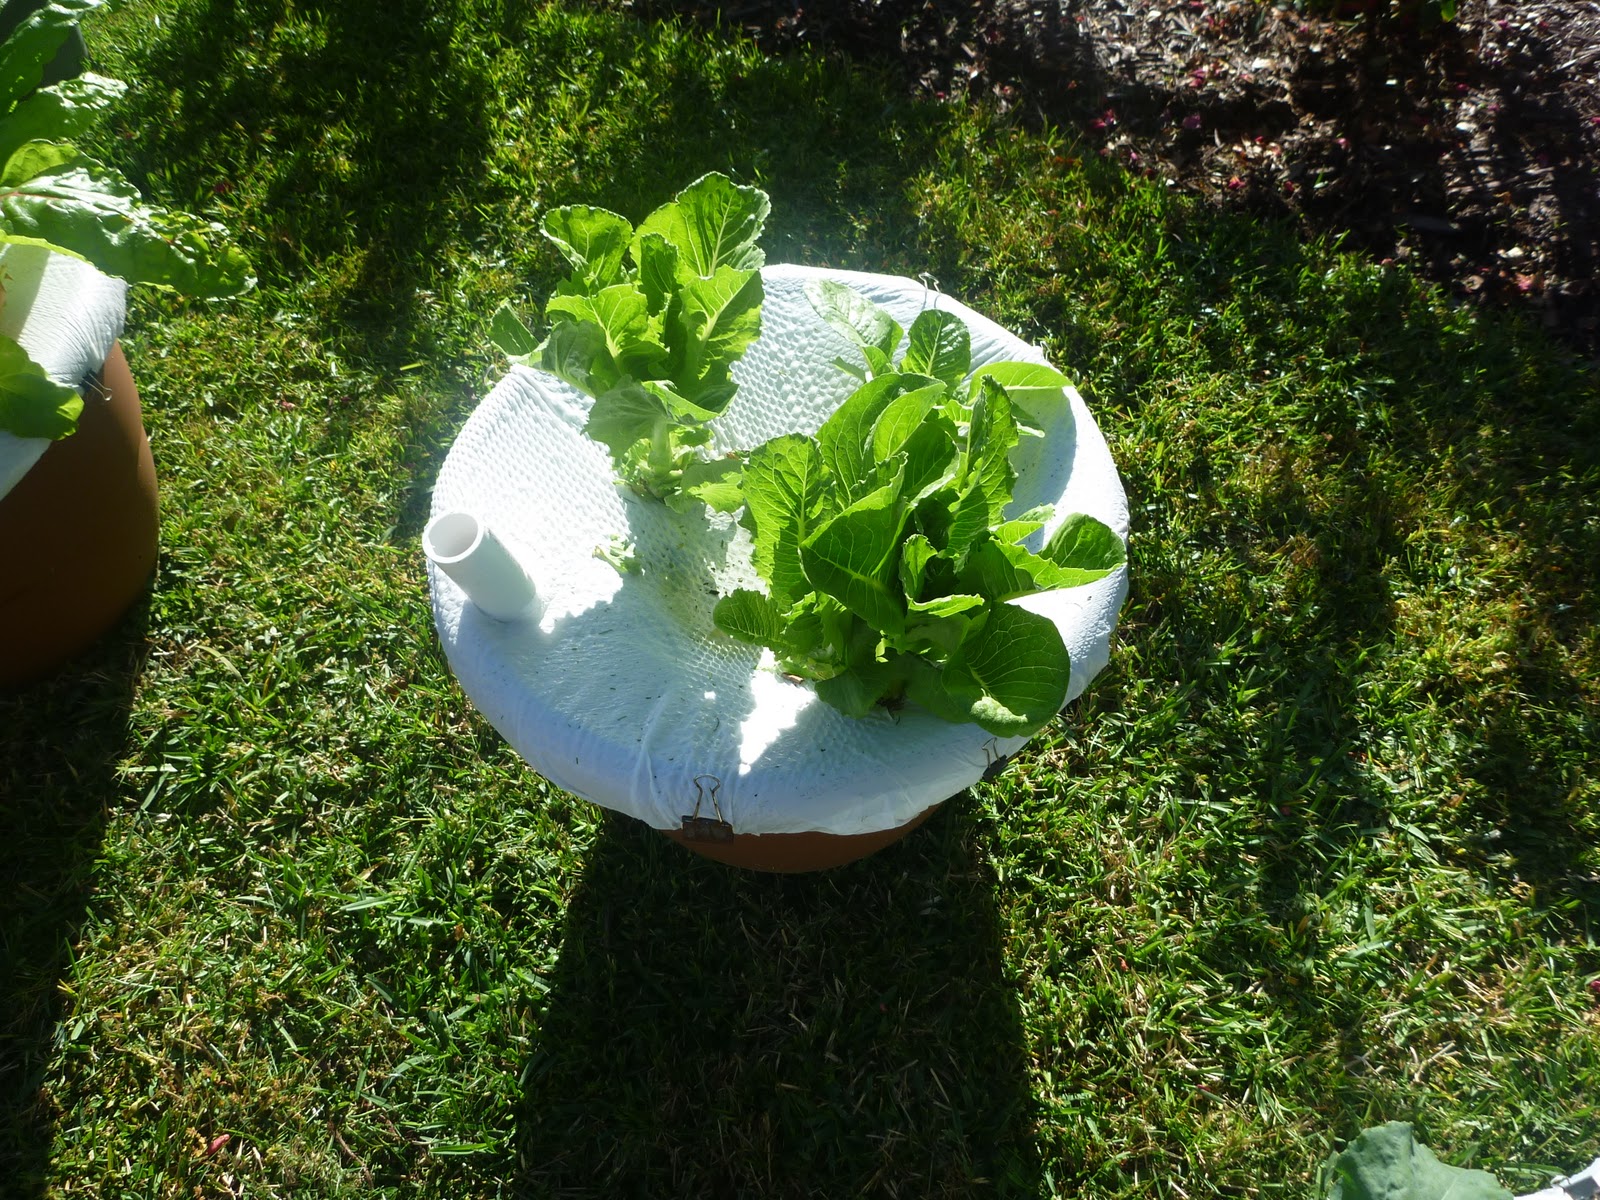
Then cover the entire container with a heavy black plastic trash bag and secure it with either string, clips or something similar. The next step is planting. Lets assume you are planting 4 pepper plants as I have done and is shown below. Cut out four (x shapes) in the plastic, one for each plant (just enough to get the plants inside the X that you cut out). See the picture below and place the plants in the soil where you have cut out the plastic with an X . Then add any additional needed soil around the plant but under the plastic. You are now ready to fill the container with water through the PVC above the top of the container box. 

Below is my finished product and a picture a week later. They are growing! I know this sounds like a lot but IT IS SIMPLE, doesn't cost much and appears to have excellent results. As you water through the top of the PVC pipe, you will notice water draining from the side holes you drilled on both ends of the container just below the "container lid support". This is normal and will keep the water at the proper level. Never water directly into the plant, just through the PVC pipe. Soon you will notice the moisture in the soil which is what is suppose to happen. It becomes a green house type effect.

Best of luck. The picture below is the latest update from both containers and the plant growth.
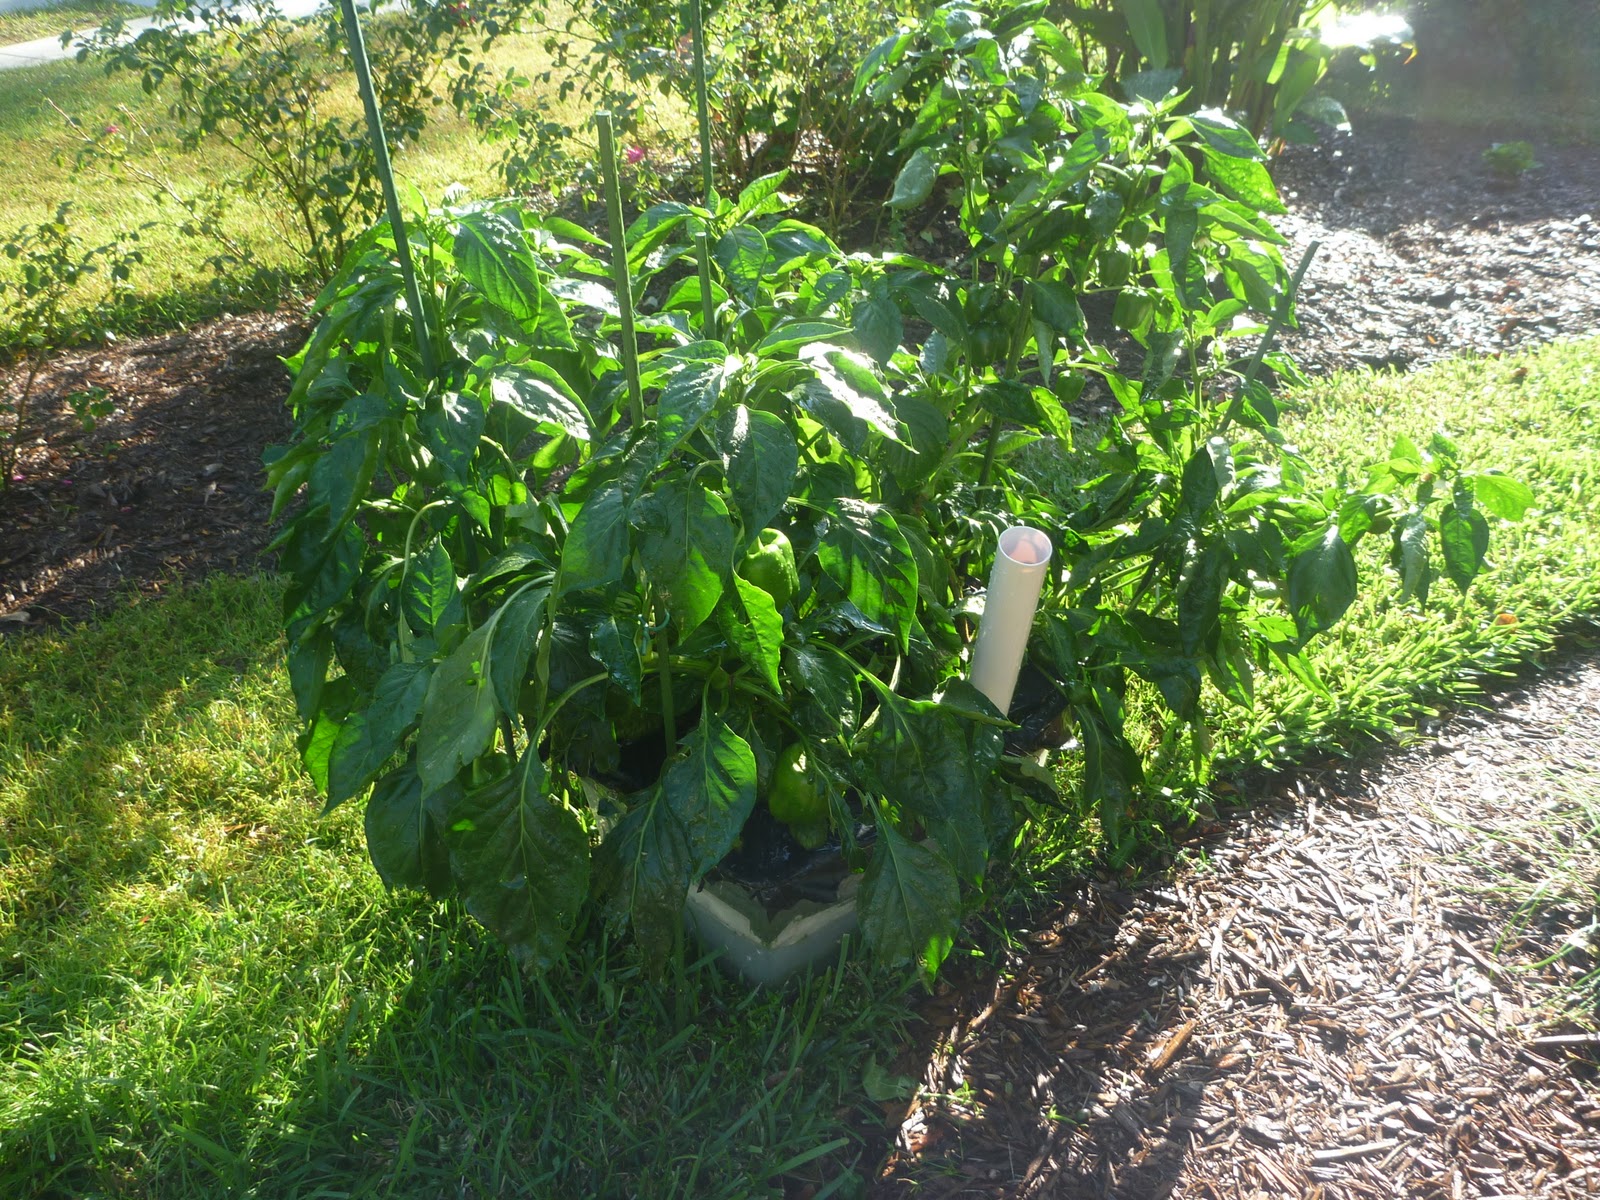